Setting in Flush
SETTING IN FLUSH
Flush setting is an advanced setting procedure. Precise craftsmanship must be executed throughout the process to accomplish the desired look.
First, drill a hole through the metal where the center of each stone is to be.
First, drill a hole through the metal where the center of each stone is to be.
To cut the seat for the stones begin with a straight side setting bur one size smaller than the diameter of the stone. For example, if your stone is 2.5 mm in diameter select the 2.3 mm bur. Cut the seat to a depth that when set the stone’s table will be even with the metal.
Then, use a hart bur the same diameter or slightly smaller than the stone. Carefully undercut the seat to allow the stone to snuggly fit into the seat. Begin by holding the bur at a 45-degree angle and cut into one side of the seat.
 Fig 3: Undercut the metal
Then with a steady hand, straighten the bur to a 90-degree angle undercutting the opposite side of the seat. The shank of the bur must be held precisely at a 90-degree angle to the metal surface or else the seat will be cut on an angle and the stone cannot be set straight. Undercutting the seat in this manner allows you to leave extra metal above the girdle of the stone to use in tightening it.
Next, lay the stone into its seat and press it into place with a brass pusher. The stone should fit snuggly in its seat.
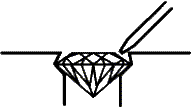
Using a small highly polished burnisher rub metal down and over the edge of the stone. Hold the burnisher at a 45-degree angle and rub around the top edge of the hole. Due to the process of tightening the stone; some setters refer to this setting technique as ‘Rub Down Setting’ instead of ‘Flush Setting’.
Do not attempt to tighten the stone by hammering on the metal surface forcing metal over the stone. This causes a dip in the surface surrounding the stone, resulting in an unsatisfactory appearance. Burnishing the metal over the stone is the preferred method of tightening the stone. If you cut the seat properly you will not need to use a hammer.
This setting procedure should result in the stone set down in the metal with a highly polished beveled rim surrounding the stone.

Fig 8: Beveled rim around the stone
Reference:


0 Comments:
Post a Comment
<< Home